How to Get Elixir Vitae

You may be wondering how to achieve the Elixir Vitae badge for healing One Million. It sounds difficult! While it’s not easy, it’s possible for any wizard. So, read through my tips and tricks for getting this badge.

The Heal

The spell you use is very important. You need to maximize your potential healing output. To do this you will use the strongest healing spell you can.
 
Flowering Dryad is the best possible option for this. Not even a doubled Scion of Life can live up to this bad girl, healing 3360 base with full power pips.
 
The average Dryad can substitute, but you will lose 15 healing per pip, a total of 210 base.

The Buffs

The buffs make all the difference. You’re going to want to use every healing buff available. Use the following spells:

• Brilliant Light
• Guiding Light
• Sanctuary Treasure Card
• Vengeful Elixir
• Shadow Seraph
• Mend Treasure Card

Let’s go through each of these cards. You can have a total of four different copies of Brilliant and Guiding Light. The trained, treasure card, item card and pet card versions. You could also use an extra 45% Guiding Light TC from the Eye of Bartelby pack, for extra insurance.
 
The Vengeful Elixir is critical to this strategy. You need to Critical Strike this heal to reach one million. Mend and Shadow Seraph spells will act as extra healing buffs to help you reach your goal.

The Stats

Stats are the key to success. You need to have at least 135% outgoing, and a friend with over 85% incoming to make this work.


Some items, such as the Stone of the Other Side or the Wolf’s Emerald Talon are drops. You can get these in Avalon and Wintertusk by farming bosses, or by checking the Bazaar. Combined, they give 58% outgoing! Throw in the Sword of Kings and any decent outgoing gear and you should be able to reach your target of 135%!

Remember!

You cannot use your heal without maximum power pips. Make sure you have those before you even try it!

This battle should be done against a lost soul in a peaceful realm. They don’t have a chance of defeating you and you shouldn’t have Unicorn Way bound wizards questing in your area.

If you’re not a Life wizard, be sure to equip a Life Mastery Amulet and an extra friend or more for the trained spells!

With all that said and done, go out there and get yourself an awesome badge!


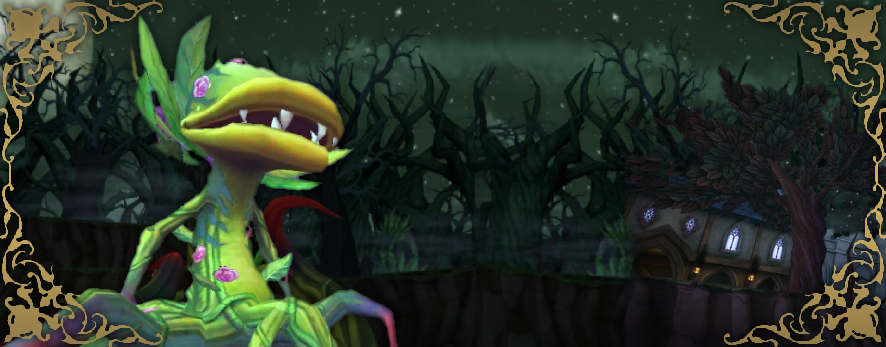
Aphrodite Strategy Guide

Now that we have mastered Darkmoor in my previous guide, the Ravenwood guide to Aphrodite is here. This boss is a key boss found inside The Graveyard. Once inside the gates go left around the battle with Yevgeny. You will find yourself at another gate which opens with a gold key.

If you are a Life wizard you will want to farm Aphrodite for “Sacred Charge” a spell that only she drops. If you are a Storm wizard you will want “Aphrodite’s Storm of Thorns.” This is the best damage athame for Storm at level 100 and beyond.

Wizards of any school may be here to enhance critical rating or improve their energy gear. With the staff for 10, ring for 8, and athame for 6 energy, you can increase your Wizards current energy by 24 points. A significant boost for any gardener or fisher in the Spiral.

Now let’s talk about how to conquer this overgrown flower and her Spirit School Tentacles.

There are four important roles in this battle. Each wizard must understand and fulfill their duty in order for the team to succeed. The positions we need to fill are


Hitter
Healer
Spammer
Trapper

Hitter

The hitter will need to stack traps, then aura, Shrike, and hit. Do not use blades, this includes global rings such as Darkwind that act as a blade. Any school can hit, but over-time attacks such as Dragon are not recommended. Failing to kill on the first strike with an over-time attack, will trigger an overtime cheat from the Life School Tentacles.

A Storm attacker will want to stack different forms of the Windstorm spell. Use regular and Potent Windstorm along with any other Storm traps you can get your hands on. Four stacked Windstorms is a thing of beauty against this rampant vine. You can achieve this, by stacking Treasure Card, regular, Potent, and pet or jewel forms of the card.

If you are a Storm, and your damage is lower than you would like, keep a Supercharge in your side deck. Any blade will trigger an all one enemy cheat from the tentacle diagonally across from you. As long as that tentacle isn’t Myth this is the one blade you want to risk. With a full pip Supercharge and stacked Windstorms, you should be able to one-shot this boss. Your Treasure Card deck will hold zero-pip shields which you should use defensively while building up the Supercharge.

If you are the hitter, do not run in with the team for the first round of battle. Once the spammer lands a hit, it is safe to join the battle.

Healer

I have a specific strategy I like to use for healers with this boss. Like Storm’s strategy, it will serve you well in Darkmoor.

Round One: Cast Empowerment or Adapt

Round Two: Cast Sanctuary

After these two moves, you will have all the pips and all the power you need to keep your team alive. No matter if you don’t yet have the best gear. Even two strong Rebirths in a row can be possible if you make these two moves first. Do your best to replenish your Empowerment or Adapt when it runs out to keep the extra pips flowing in. The rest is up to you and your healing style.

An important note for Life School healers in this boss, you may get hit with Life Dispels. You should carry shields to take them off when necessary. If you have one, equip a may-cast healing pet. This pet might clear those Dispels allowing you to heal the team rounds sooner.

Regular Cards on the left and Treasure Cards on the right

Spammer

In Wizard101, when we ask for “spam” we mean: To hit each round with small attacks. As a spammer in this battle, the most important stat for you to focus on is accuracy. I like to equip a Sidhe Wand for this reason. Whatever equipment you choose, the important thing is to increase your accuracy in every possible way.

Missing or fizzling your spam hit will cause the flower to drop its spores. This means Black Mantle, Plague, and Infection along with an overtime attack on every member of your team. This can trigger a self-feeding loop where one fizzle causes another until the team just can’t win. As spammer, you need enough accuracy to overcome the Black Mantle every time.

You must hit every single round, like clockwork. I like to keep my Treasure Card deck full of one or two pip spells when I am relied on as the spammer, so that there is never any reason to not have an attack.

As I mentioned above, over-time spells are not OK here. If your spammer is Life or Death school, they could end up Dispelled a round. The healer or trapper should have a few small hits in to back-up the spammer, just in case.

It does not matter which Tentacle you choose to spam as long as you spam the same one each time. This will allow the trapper to do their job.

Trapper

The trappers’ job is to stack Feints and traps on the tentacles while the hitter builds the attack. Feints and Potent Feints should be cast on all the tentacles that aren’t being hit by your spammer. Hex, Curse, and Elemental or Spirit traps are all also ok to use. Ideally, the trapper should be next in line after the spammer in battle order. This way, on the hit round a final Feint can be cast.

If the team works together and everyone plays their part, this battle can be fun and smooth. Good luck getting those drops, and I can’t wait to see you in the Spiral!
~ Amber Ravynsong

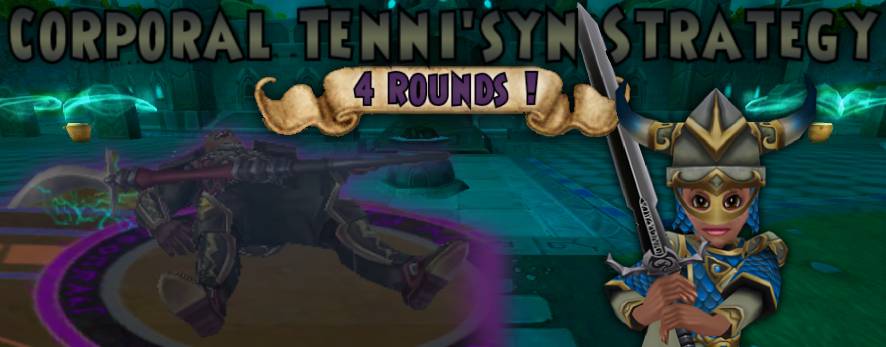
Corporal Tenni’syn Strategy!

Corporal Tenni’syn is a Gold Skeleton Key boss found inside the Zanadu Sewers, Empyrea. He drops the best offensive robes for every school, except Storm. Storm wizards will still want to use the Malistaire robe even at level 130.

Initially, this boss seems difficult, but with enough knowledge and game sense, he is actually incredibly easy! So, here is how I killed Corporal Tenni’syn in 4 rounds!

The Cheats

Tenni’syn uses a couple of important cheats to note. They can be annoying, but there’s no way to avoid them.

Only Feint once per round

If you feint Tenni’syn more than once, you’ll activate a cheat that removes every single trap that the team has placed on him.

Natural attacks lead to random Wild Bolt spam

Whenever he uses his natural attack he will shout about how it is “time to finish this!” Now, this sounds rather silly, but what follows isn’t.

He will spam up to 7 wild bolts on a random member of the team each time this attack occurs. Be careful because he’s packing a lot of damage and pierce!

Gains 3 Pips after every turn

After every round, no matter what, Tenni’syn will gain 3 power pips. This gives him the power to spam spells such as Glow Bug Squall, Sirens and Storm Lord.

Don’t Dispel

Other sources may claim that using dispel is ok if it is only used once per round. In my experience this will trigger a cheat that clears all negative charms. A better defensive strategy is to use Juju or storm shields.


The Strategy

Now that you know the cheats, lets find out how to deal 80,000 damage in 4 turns every time. Even when blades are cleared by Glow Bug Squall, Sirens and Catch of the Day, it’s still guaranteed to work. Here are the key points.

Jade gear and Storm resist

Having a wizard that can tank all the storm hits is important. Send someone in first who has high storm resist. The battle order is decided by the order in which your team enters the key room.

Scion 

When you hit use Scion of Storm with a prism, or Scion of Myth with 2 stun blocks up. Scion will allow you to one shot Tenni’syn on the 4th round.

Feint

Have the team member with storm resist feint using Potent, regular, and a Treasure Card to make the Scion kill guaranteed, even if he clears all blades.

Critical block 

In my experience, he must not have much critical block. He has never blocked a single one of my critical hits!

The only additional note is that he may use blades, so your team will want to carry enfeeble in order to get that Scion damage doubled.

 That’s it! It’s honestly that simple. I wish you the best of luck while farming!

Member Benefit Tier List!

Everyone loves a good old-fashioned tier list!  Everyone loves Wizard101 member benefits! Why not combine the two and create our very own Member Benefit Tier List!

I will list all the member benefits under a category, starting at being the worst and finishing in the S tier being the best. Please note that these tiers are based on opinion only and are not fact. You may find that you love Double Animus and don’t care for Double pet XP. Let us know your thoughts in the comments below!

The D Tier

Double Monstrology Exp and Animus
Daily Assignment and Daily PvP Assignment Boost

I know Monstrology has its fans, including myself. But most of the players I have spoken with just aren’t that into it.  

As for the daily assignment boosts,  to me this is be the least useful of the bunch. I was only able to complete a few assignments within the time given, limiting the benefit from it significantly.

The C Tier

Free Chest Re-Roll
Training Point Buy Back

These are both nice benefits but they have some problems restricting their potential! First off, although this benefit can be useful for newer players it’s rare that you would want or need to buy back your training points once you have gained a better understanding of the game. This makes this benefit far more useful for new players than more seasoned wizards who have little need of it.  

The chest re-roll is limited to one re-roll per boss each day. Making farming a little nicer for one run but still not providing an amazing benefit.

The B Tier

Zero Energy Fishing
Double Reagents and Unlimited Crafting

This member benefit definitely has its perks. Whether you’re trying to level up, catch new fish, find a rare wand or even a new permanent mount to add to your collection, this benefit lets you go wild with lures!  

While fishing can seem boring for some, others find it to be a relaxing change from the usual game play. The hunt and grind for what you want is always worth it when you finally get it, and fishing is no exception since it offers some great rewards. If you haven’t tried fishing yet you may not find this benefit to be very exciting, but anyone who’s fished before will understand just how good unlimited fishing is!

Double reagents are just amazing. Every reagent you collect by gardening, gathering or fighting is doubled. Always paired with unlimited crafting, there is no cool down time when you craft items. With no timers, you can craft to your heart’s content whilst doubling your chances of getting some of those pesky, harder to get reagents!

The A Tier

Double Pet xp

Everyone loves double pet experience. It’s fortunately a common benefit, and everyone rushes to the Pet Pavilion to train up their pets which we all know will inevitably fail and leave us crying ourselves to sleep… no? Just me? With double pet XP every game you play or snack you feed to your pet gives twice the benefit that it would have normally. So, a Fancy Yogurt that would give your pet 50 XP will give you 100 XP during this benefit. Almost enough to level to teen in one snack! Even gold bought snacks like Shanta Pudding give significant boosts to your pets XP during this reward.

Either way, we all know and love Double Pet XP and we’re all praying it doesn’t go anywhere, anytime soon! 

The S Tier

Double Gardening Rewards

Welcome to the crème de la crème! This is undoubtedly the best and tragically the rarest of all the member benefits. We get this gem a few times a year and boy do we capitalize!

Whether it’s Couch Potatoes, Evil Magma Peas, King Parsley or Pink Dandelions, you will double every single seed, snack, reagent or housing item that your garden drops during this reward. 

_____________________________________________________________________________________________

So that was my tier list of all the eight current member benefits available in Wizard101! Let us know in the comments if you agree!